Pages

July 29, 2011

Refashion Friday: adding a kick pleat


In our family we often find jean skirts that are nice except for one thing - they have a big slit in the front.

Do you have a skirt with a slit that you've been wanting to wear?

Well, dig that skirt out of your drawer...
 
...and add a modest kick pleat!
It will be the same skirt you liked but when you walk you'll see more fabric inside instead of... well, you know! I made this for my mom and we're very pleased with the results.

First, find some jean fabric to make the insert pleat with. I used the back of a leg from a pair of pants. Then figure out how much fulness you want to be in the pleat. We wanted the finished insert in this skirt 8 in. wide so I made piece of fabric was about 12 in. wide. Measure the length of the slit in your skirt. Add 2 in. for the length of the insert. Hem one end of the insert with the same hem allowance as your skirt.

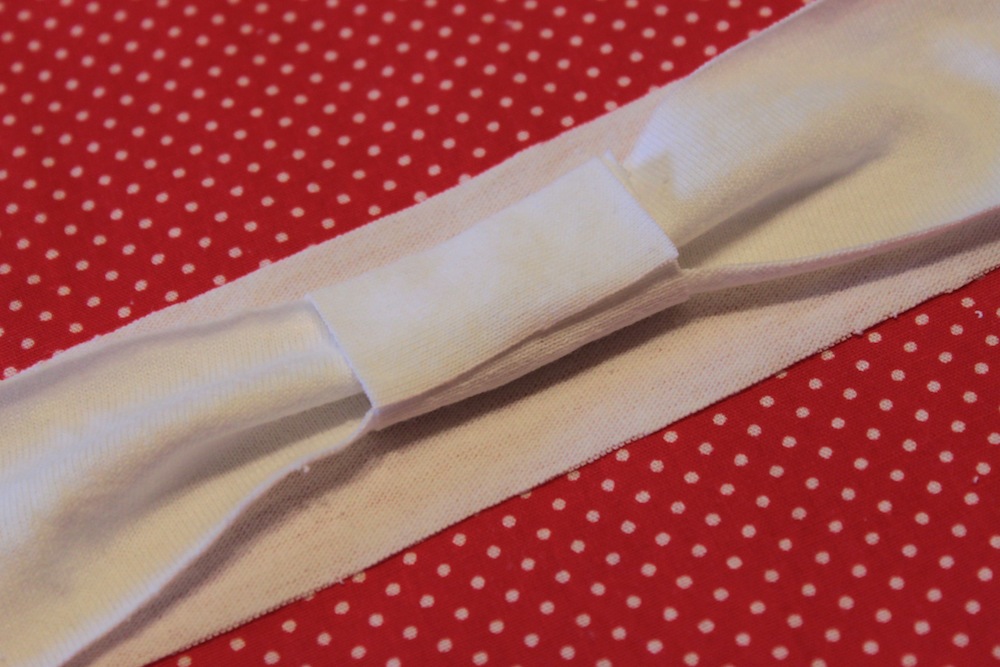
Fold the insert in half and mark a stitching line 4 in. from the fold. Baste along that line. (It is very important that you baste the seam instead of using a regular stitch as you will be ripping it out later on!)

Open up the fold and bring the center to the basted seam. Press.

Take the left side of the fabric on top of the pleat and bring it to the side pulling all the other fabric to the right so you're holding a single layer of fabric.

Lay it under the left side of the slit lining up the basted seam and the seam of the slit. Pin and stitch.


Now push the pleat that is under the right piece toward the left side. Lay the right side of the slit over the single piece of fabric. Pin and stitch.

Rip out the basted seam in the center of the slit.

This is what it should look like from the inside. You can trim off the excess fabric and zig zag the edges so it won't fray over time.

Enjoy and be comfortable in your modest skirt. :)

linking up here

July 26, 2011

Bulletin/inspiration board

This is my bulletin board that I recovered recently to match my room. I love having a place to stick pictures, cards, notes, sketches and lists. I covered it the way the ladies from Marie - Madeline Studio  cover theirs except that I stapled the fabric onto the board instead of pinning it. It worked great!


Linking up here

July 25, 2011

Shop Closing Sale - 40% off all items!

Abigail and I will be temporarily closing our Etsy shop, but would like to offer y'all a great deal first. Use the coupon code JULYSALE for 40% off the original price on all items! Enjoy. :)

July 15, 2011

Refashion Friday: Flip Flops


How do you get cute summer sandals for $1? You hit the $1 flip flop sale at Old Navy and refashion them! I cut the plastic straps off my flip flops and then made my own knit fabric straps. I love them! My pattern needs a little tweaking, but I liked how they turned out for my first pair.

I want to make a tutorial for these, but it's kind of hard to make a pattern and take pictures for a tutorial at the same time so you'll have to wait until I make another pair. :)

I put sequins on mine, but there are lots of possibilities for other accents like flowers or ruffles. The sequins were from the shirt that I cut up to make these flip flops.

I've enjoyed doing Refashion Friday posts again! Obviously, I haven't been doing them every week like I intended, but since it's just for fun and de-stashing I guess it doesn't really matter.

linking up here:
Frugalicious Friday
Frugal Friday  
Weekend Wrap-Up Party 

July 12, 2011

Strawberry Garland Tutorial

I love the taste of strawberries and how they look too, so I enjoy any strawberry related projects. My sister asked me to make a strawberry garland for my niece's first birthday and this is what I came up with.

To make your own you will need:

red and green felt
white fabric paint
white ric rac
hot glue

First, draw a strawberry and a stem for a pattern.

Cut out an equal amount of strawberries and stems. My piece of ric rac was a little longer than 5 feet and I cut out 15 strawberries.


Use the white fabric paint and make small dots over the strawberries for "seeds".


Hot glue the leaves onto the strawberries.


Now glue them onto the ric rac, evenly spaced.

This garland is perfect for a party or to give your home a "summer flavor"!

linking up with


July 1, 2011

Refashion Friday: Stars & Stripes Headband Tutorial


Are you looking for something patriotic to wear for the 4th of July? The 4th is only three days away, but if you have some red, white and blue jersey knit fabric scraps you can whip up this headband in a few minutes. I used the fabric from old t-shirts to make mine.


Lets get started!

1. Cut a strip out of white knit fabric 2 in. wide. Measure your head where you would wear a headband. Subtracting 1 1/2 inches, make this the length of your strip.

2. With right sides together stitch the headband closed. I used a half inch seam allowance. Press the seam open.


3. Cut out a 1 3/4 in. by 3 1/4 in. rectangle out of the same white knit.


4. Lay it under the seam of the headband. Kind of scrunch up the headband and wrap the small piece around it.


5. Pin and stitch.


6. Cut out two red stars and two blue stars. Go here to learn how to draw a perfect star.


7. Layer the stars of the same colors and stitch them together.


8. Pin them onto your headband and stitch them in place. Just follow your previous stitches on the stars. Don't worry about getting it perfect; it will still look good.

9. Draw pencil marks from one side at 1/2, 1 and 1 1/2 in. This will be your cutting guide.

10. Cut down the lines. Again, don't worry about getting them perfectly straight since the edges are just going to curl up.

linking up with Frugalicious Friday and Weekend Wrap Up Party.

Enjoy and thanks for reading!